Friday, December 29, 2017

Herbal Medicine: Fire Cider


 a


Shalom Shalom!

Please excuse the delayed response in this--as I've been wanting to put do this particular entry for quite a while.  There were a few difficulties, but despite that, I'm going to submit it anyway--as this is important, considering that we're knocking on the door of cold and flu season.  I saw one YouTube video about fire cider, but have bypassed it for a long time.  Then, one day, I started to take a look at it, and became intrigued.  Since then, I've been researching on how to make it, and remember a couple in our congregation mention that they made some after the Shabbat.  I asked for the recipe--as I was still in the research phase.  Looking at this family's recipe and based on my other research, I think I got it.  Now, I'm sure you're wondering, "What the heck is fire cider?"; otherwise, you wouldn't be reading this entry.  Fire cider (or Master Tonic or 4 Thieves Vinegar--which are other names for this) is a powerful concoction with ingredients that have antifungal, antiviral, and antimicrobial properties.  Some people will consider it as "nature's flu shot".  It is used as a preventative to keep colds and flu at bay, and should you get a cold or flu, it should knock it out rather quickly.  Interested?  Stay tuned...
Here's what you'll need.  The amount of ingredients may vary--depending on how the ingredients are broken down or your tolerance level on certain ingredients.  For my recipe, I used:
*Fresh Horseradish Root
*Fresh Garlic
*Fresh Ginger
*Fresh Turmeric (if you have only dried, then that's fine)
*Black pepper
*Fresh Hot Peppers (the store only had organic jalapenos.  Subsequent batches will be made with hot peppers grown from my garden).
*Onions
*Lemons
*Apple Cider Vinegar
*Raw Honey (to be used at the very end)

(NOTE:  All of my ingredients are organic.  I encourage you to get organic ingredients if and when possible.)


Oh yeah, you need something to put those ingredients in.  Make sure you have a 1-gallon glass jar.


For this recipe, I'm using one fresh horseradish root.

Because it is rather large and somewhat difficult to cut and peel, I cut the root crosswise in half, and then cut the halves in half.  This also makes it easier for peeling off the skin


As I was peeling, there were some knobby ends that my vegetable peeler could not reach.  So, I cut them down a little more--to make peeling easy.  Try to get it cut and peeled as easily as you can.  

The first batch I made, I just chopped the horseradish in small cubes.  I found that a bit time consuming. This time around, I'm chopping them finely using a food processor.  I found it said in my research that the finer the ingredients are the better the vinegar can penetrate and draw out those wonderful sickness-fighting properties.  That being said, the horseradish root went into the food processor...

...and into the jar.  As you can see, about a third of the jar is already filled.

Next is the garlic.  You'll want to use whole heads of garlic.  As you can see in this pic, there are four heads of garlic; however, in the end, I used 7 heads.  I love garlic, and it has AMAZING antimicrobial properties!

Each head had the cloves separated, peeled, and put into this cup.  This is the processor cup for my immersion (stick) blender.  I used it when the ingredients weren't as much to fill up a food processor cup.

Like the horseradish root, the garlic is also finely chopped...

...and into the jar.

Next, we have ginger.  Ginger is also a good anti-inflammatory.  I used all of the ginger in this pic...

...peeled it..


...and placed into my small cup for my immersion blender.  Although it all fit, for some reason, the blade could not finely chop it.

No worries!  Regular-sized food processor to the rescue, and it worked beautifully!  


Into the jar it goes!


Next, we have turmeric.  For those who have never seen fresh turmeric, then this is what it looks like.  It looks very similar to ginger--as it is in the same family.  Unlike the ginger--which was a yellow color, turmeric is a reddish-orange color.

WARNING:  If you do not want you hands to be stained, USE GLOVES!  Turmeric WILL stain the crap out of anything and everything.  Like the ginger, peel the turmeric

See!  That would've been the color on my fingers if I had not worn gloves, AND it stays on your fingers for a couple of days.  This is my gloved hand after peeling the turmeric.


Take your peeled turmeric and place in a processor cup.


Mince finely...

...and add to the jar with the rest of the ingredients.

Next add your black pepper.  I prefer peppercorns, but I didn't have enough. I wanted enough to create a layer; however, we had already ground black pepper on hand.  So, I used it...lol.  I've read that turmeric and black pepper, when combined is an awesome antibacterial powerhouse!  These two ingredients are good to use if you have a toothache in terms of alleviating the pain.

Next ingredient...hot peppers.  As I mentioned earlier, the store only had organic jalapeno peppers, so I got those.  I would loved to have had serranos or habaneros--as I've heard that the hotter the pepper, the better.  I've gotta work with what I have right now--as the growing season is in another six months.  So take you peppers, chop of the tops--where the stems are...

...and place in the processor (or finely chop by hand, if you don't have a processor).  Put in everything--seeds and all.


Chop finely...


And place in the jar.  As you can see, my jar is filling up.

Next ingredient...onions.  Use whatever onions you have in the house.  My preference is red onions.  I use them for everything.  What you'll want to do is peel and cut the onions in large chunks.


Transfer the large chunks into the food processor (or finely chop by hand if you don't have a food processor)...


...chop finely...


...and place into the jar.  This jar is looking rather full, and I have two more ingredient to add!

Next ingredient...lemons.  You'll definitely want to get organic lemons--as the entire lemon will be used...peel, pulp, and seeds.

What I did was cut the ends off of the lemons, sit them up, and cut off the peel with a knife.  I then cut the lemons in large slices...

...and added to the food processor.  The pulp chopped up nicely, but the peels didn't.


So, I chopped up some of the peels.  I didn't chop it all, but you should still get the same effect.


In the jar it goes.  I actually had to pack it all in, but it all fits so far.

Here is the top of the jar.  Now, one more ingredient to go (for now)!


That last ingredient at this time is apple cider vinegar. After all, this is called "fire cider", so there has to be a liquid component to this!  Raw apple cider vinegar is awesome!  It clears acne, alkalizes the body, and has tons of antimicrobial, antifungal properties!  My first batch, I used two 32-oz bottles.

Next, pour in the apple cider vinegar.  Unlike my first batch--of which I was able to use both bottles of vinegar,  I was only able to use one who one and about a third of the second one.   I guess fine chopping the ingredients took up much room needed to accommodate all of the vinegar.  It's all good though.  Get as much of the vinegar into the jar as you can.

(NOTE:  I plan to make one more batch--of which I will still finely chop the ingredients, but perhaps, use less ingredients.  Once it's done, I will post a picture of it as an addendum.)

And voila!  Here is the beginning of our fire cider.  Now, allow to sit in a dark place for 6-8 w.eeks--shaking it at least once daily.

I know, 6-8 weeks is a long time, and again, I apologize that I didn't get this sooner. You can, however, buy fire cider online.  If possible, I would encourage you to buy some until yours is ready.


Ok y'all.  Here is my very first batch. As you can see, I started in September.

The pic on the left is when it was just assembled. In this one, I used one horseradish root, three heads of garlic, two huge pieces of ginger, a handful of fresh turmeric (It wasn't enough for me, so I also used some powdered turmeric as well), three jalapeno peppers, three red onions, and two full 32-ounce bottles of apple cider vinegar (I forgot the lemons in this one).  Perhaps because I used less ingredients, and didn't chop them up so finely is why both bottles were able to be accommodated.  This is still a work in progress.  Please bear with me.  The life in general is a work in progress...lol

The pic on the right is two months later--ready to be strained, bottled, and consumed.

Next, you'll want to assemble your straining station.  What I have hear is a large bowl, a large mesh strainer over the bowl, and cheesecloth over both the bowl and the strainer.


Next, pour the contents into the straining area.  To help speed up straining, pick up the cheesecloth, and allow the liquid to pass through and into the strainer.  It also wouldn't hurt to squeeze the cheesecloth to get out more liquid, but I must caution you, like I did earlier, WEAR GLOVES because of the staining effects of the turmeric.


This is how much liquid I was able to strain out. 

Next, add one cup of raw honey.  Raw honey has wonderful antimicrobial, antibacterial, and healing properties.  Raw honey (as the pic shows above) is more solid than the regular honey you see sold in the grocery store.  Any processing done to the honey in this pic is, more or less, strained from the comb with little to no heat applied--as heat kills the valuable enzymes and healing properties in the honey.  This also contains bits of honeycomb and propolis, and this is what you want.  I'll need to do a little more research on the honeycomb, but the propolis is powerful!  It is what is used to seal and sanitize the hive, and it is especially used by the "nurse bees" in terms of sanitizing combs used to house the eggs lain by the queen.  It keeps such combs sterile and clean for growing baby bees.  

Raw honey is also good for wounds and cuts, and it is a good natural antihistamine.  Taking down a spoonful of raw honey during allergy season will keep your sneezing at bay, but I digress...

Add the raw honey to the liquid and mix it thoroughly.  As you can see it is still a blob in the liquid.  Simply mix and swirl it around until it dissolves.

Alas.  Fire cider...done!

Now, it's time for the bottling.  To make bottling easier, I transferred the finished product into this 4 cup glass cup (or whichever implement that you have with a spout.  I would recommend glass for easily cleanup--as the turmeric will stain plastic).  Just in case there was some unwanted sediment, I placed this small mesh strainer over the cup,


Next, I ladled the mixture in the cup.  Since I saw no unwanted sediment, the strainer was removed.


Finally, time for bottling.  I am using 32-ounce amber glass bottles.

Next, pour the cider into the bottles...

...and voila!   This fire cider is REALLY ready!  As you can see, I have two 32-ounce (larger) glass bottles.  Because I had some extra, I stored that in a smaller 16-ounce bottle, and it was perfect!
Also, label your bottles.  That way, you'll know when it was made AND what's exactly in the bottles!


Here is the finished product in a shot glass.  This is the recommended dosage for adults.  Take one shot as a preventative.  If you get sick, take a shot every hour or two--until you start to feel better.  For children, I would recommend 1/4 or 1/2 of the dosage--depending on the age of the child and their affinity for spice and other flavors. 

 I understand that with the ingredients used, that one would think it tastes gross, but actually, it's not bad!  I thought it tasted like salad dressing.  My Ish thought it tasted like pickle brine.  The spice wasn't too bad, either, nor was it too sweet or sour.  It tastes better than it sounds based on the ingredients.  Now, the batch that I made based on the process above might be a bit spicier, but we will see.  I will provide an addendum--as well as one with the next batch that I make.


Now, about those solid contents.  What do you do with them?  As you can see, I have them in a freezer bag, so I am not throwing them away.  In my research, I saw that the solid contents can be dehydrated and ground into a seasoning.  So that is my plan for this.  I'm still debating as to whether to use the oven or wait until I can save my pennies for a dehydrator.

I hope that you consider making fire cider, and keeping it around in your medicine cabinet.  Because all of these ingredients are food, they should pose no problems to your health (unless you are allergic to any of the ingredients or have certain health problems.  I've read that fire cider should not be consumed if you're pregnant--as the horseradish could cause a miscarriage).  Big Pharma is a multi-billion dollar industry, and is, more or less, "legal" drug dealers.  The products brought on by Big Pharma temporarily alleviate symptoms, but do not provide a cure.  Not to mention, many of the pharmaceuticals come with various side effects, and oftentimes, you may be prescribed another medication to counteract the side effects of the original medication.  That secondary medication may have its own set of side effects.  How is that healing?  How is that making one feel better?  Sorry (not sorry)...it's not!  I would encourage all who read this to research and look into ways to cure any disease or sickness naturally--as it can be done.  It was done before the onslaught of Big Pharma, and it can be done now.  I hope that you found some inspiration in this, and if you make your own fire cider, please let me know how it turned out for you--as well as other tips and tricks that you've done in the making of your fire cider.  Thank you so much for taking the time to check out "Teacher Of Good Things", and until then...Shalom shalom!
Bathshua


Thursday, November 16, 2017

Gardening: Seed Saving


Shalom Shalom!

Now that the growing season is over, it is now time for cleaning the garden, planning for next year's garden, and...saving the seed.  While it's good to plant a garden to grow your own food, saving the seed is just as important.  By saving the seed, they can be used for growing any given crop in subsequent years.  It's also cost effective--in that you won't need to purchase more seeds in the next year.  This is extremely important if your goal is being self-sustaining.  When you have companies like Monsanto--who requires farmers to purchase new seed every year (even if they have extra), we need to be certain to keep heirloom, open-pollinated seed--so that we don't have to follow that model.  When saving seed, it is important that the vegetables that you plant are either heirloom or open-pollinated seeds.  Heirloom/open-pollinated seeds, when you save them, will remain true (i.e. will come out to be the same each year).  Hybrids, on the other hand, will not remain true, but perhaps some funky mystery plant.  In the very near future, I will do an entry on my favorite seed sources...so stay tuned.  Anywho, the purpose of this entry is seed saving.  Below are some of the seeds that I actually saved and was able to document.

Saving Tomato Seeds
Tomatoes...The pinnacle of ANY garden.  Unless you're allergic or don't like them, you will RARELY see ANY vegetable garden without tomatoes.  You've enjoyed your bounty all summer long, so why not get it back by saving the seeds?  Here's how:

All you need is one ripe tomato.  The size doesn't matter--as long as it's ripe.

This tomato is called a Golden Jubilee.

Cut the tomato in half...

...and squeeze the seeds and the pulp in a container.  As you can see, I am using a half-pint (4 oz) glass canning jar.  

Keep jar uncovered and allow to sit until a mold forms at the top.  Yes...mold!

Five days later, and you see the mold.  I will admit, the mold set on after three days, but I didn't have time to get to this until two days later.  The mold is okay!  What needs to happen with tomato seeds is that they need to go through a fermentation process--in order to become viable for saving.  The mold IS that fermentation process.  It's all good.

Next, add water in the jar, to loosen the seeds...

...and use a mesh strainer to allow the water to pass and to catch the seeds.  

Rinse the seeds until they are cleaned of any remaining pulp and mold.

Place seeds on a flat surface for a few days to dry.  Once dry, store in a cool, dark, dry place.


Saving Sweet Pepper Seeds
Just as tomatoes, peppers, are just as integral.  Although in the same family as tomatoes, pepper seeds do not need to go through a fermentation process.  As a result, to save the seed is much simpler.  Here's how:

Take a ripe sweet pepper.  As you can see, this is a red bell pepper

Cut off the green top...

..and place on a flat surface top down.

Cut from the top, or shall I say, bottom...

...and around.  Take care not to cut in the middle--where the seeds are.

 
This is what your pepper should look like.  As you can see, the seeds are in the center of an inverted top.

All you do is simply scrape the seeds off of the top of the pepper, and onto a flat surface...


...and allow to sit out to dry for a few days.  Once dried, store in a cool, dark, dry place.


Saving Hot Pepper Seeds
Do you like salsa?  If you do, then hot peppers are required.  Now, with processing hot peppers, you will need to take a bit of precaution, but you can do it, and trust me, it;s worth it.  Here's how:

Take your hot peppers and put them on a flat surface.

These are Serrano chile peppers.  They are usually eaten green, but when they ripen, they turn red.  You want to make sure that the peppers are ripe for seed saving. 

Here's the precaution...WEAR GLOVES!  The heat in the peppers come from the ribs and the seeds.  If you touch these areas without gloves, you'll want to wash your hands THOROUGHLY once done handling them.  Otherwise, should your fingers touch a mucous membrane or any sensitive area, it will cause a sting in that area.  So to avoid that altogether, it is advisable to wear gloves.  Any thin gloves (i.e. Latex, Nylon) gloves will do.

Take the knife, and cut the the top off, and then inside around the ribs for easier removal.  Once you cut around the ribs (the middle), place on a flat surface.  You DO NOT want to cut the rest of the chile in this position--as you are at risk of cutting yourself.  Safety first.

]
Once set on a flat surface, cut the chile down the middle...
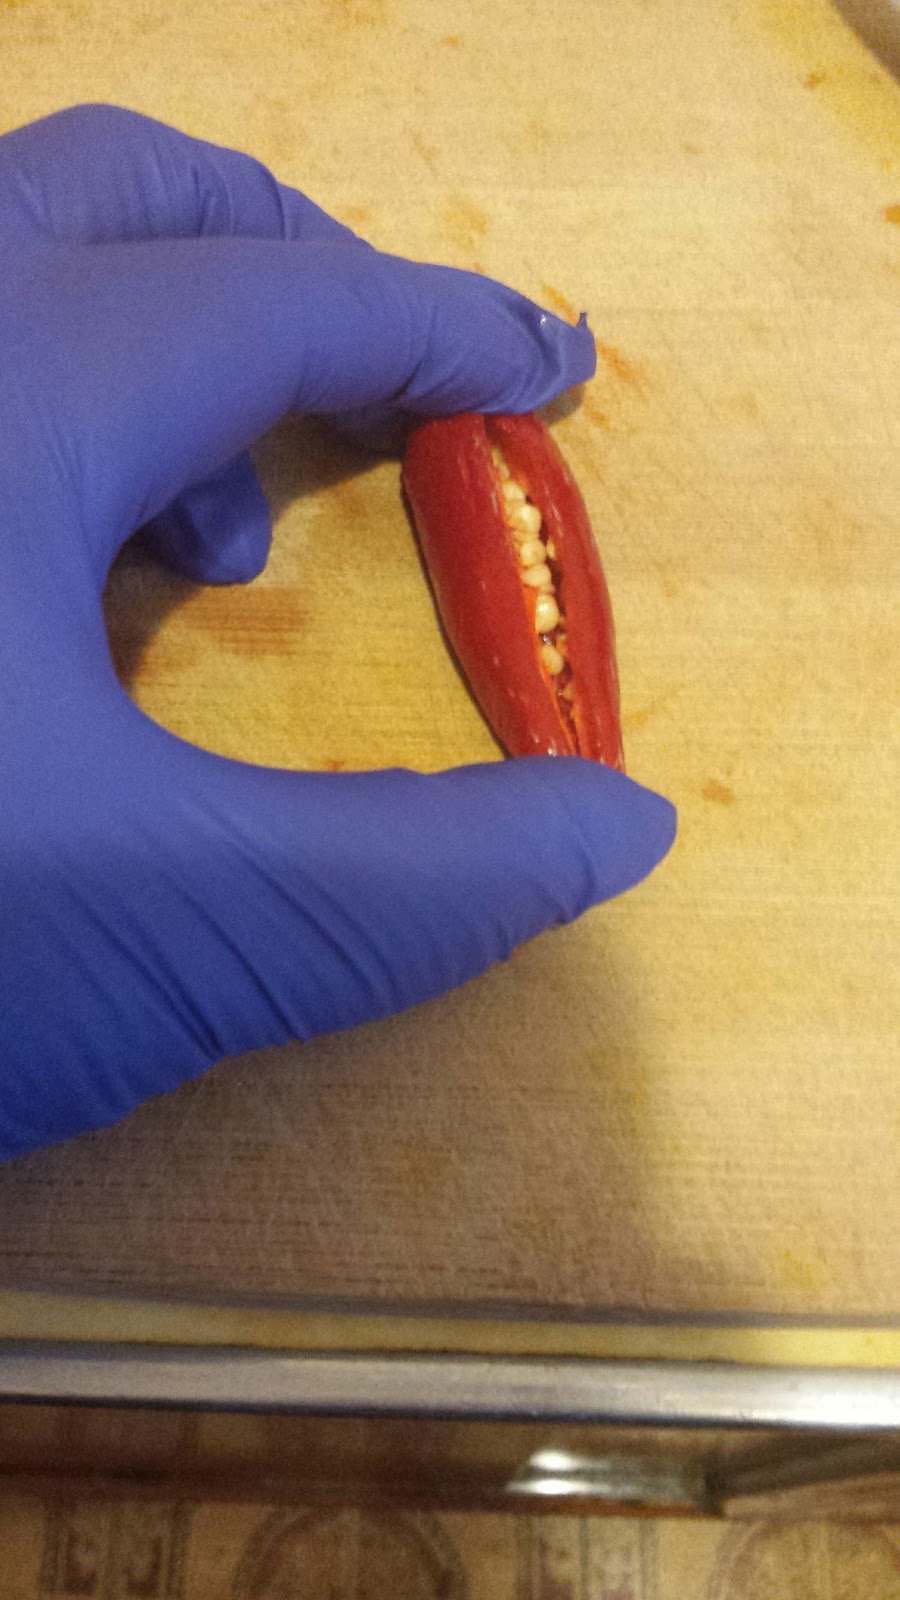
..and open it up, exposing the seeds.

As with the sweet peppers, scrape the seeds out of the chile and onto a flat surface.  Once dried, store in a cool, dark, dry place.


Storage

Once dried, store in a cool, dark, dry place.  The first step is to put the seeds, once dried, in a receptacle.  As you can see here, I stored my dried seeds in seed saving envelopes.  I got these off of Amazon.  There were 50 in a pack for a couple of dollars.  If you don't have these, use some kind of envelope to store your seeds.  After placing your seeds in an envelope, label them.  Seeds do have a shelf life.  Most seeds, when properly stored and depending on the kind of seed,will last for about 4 to 10 years,  Label and date them for record keeping.What I also do is put the seed packets in a plastic bag, and in a plastic 5-gallon bucket that I keep in a closet.  I also separate the seed packets based on the species of crop.  That way, it keeps them better organized.

Please forgive the fuzziness of the picture--with which the labels are difficult to read.  In case you're wondering, the seeds in the picture are the following:  Golden Jubilee Tomato. Beefsteak Tomato, Roma Tomato, Red Bell Pepper, Serrano Chile Pepper, Star Of David Okra, and a seeded watermelon that we got from the grocery store.  I know.  The last one might make you go "Hmmmm".  If you are aware, seeded watermelons are a rarity nowadays.  Most or all of the watermelons in the grocery stores are seedless.  The Most High meant for produce that comes from the ground to have seeds, so you'll want seed.  So Yes, I will make a plan to from these in the future, but I digress.


Conclusion
I hope that this gives you inspiration in terms of seed saving, and that this will help you get started.  If you start saving seeds, let me know.  I'd be interested on how things turned out for you.  

Thank you for taking the time to check out "Teacher Of Good Things".  Until next time, shalom shalom!

Bathshua


Saturday, November 4, 2017

Herbal Medicine: Tinctures

Shalom Shalom!

As the weather is getting cooler, we are now in the mode of making sure that we are prepped for winter.  In the sense of this entry, I am referring to what we need to make sure that we are healthy...naturally.  When my Ish and I got together, we agreed that we wanted to live as natural of a life as possible--even to the point of weaning ourselves off of pharmaceuticals and other chemically produced remedies.  Over the spring and summer, I have been researching tinctures as a natural mode of medicine.  Tinctures are an extraction of herbal ingredients.  The most popular mode of extraction is alcohol; however, non-alcoholic tinctures can be made with apple cider vinegar or vegetable glycerin.  I prefer using the alcohol, not because I'm a lush, but because it will last a couple or years; whereas, those made with apple cider vinegar or vegetable glycerin will last a couple of weeks or months.  I would, however, recommend using apple cider vinegar or vegetable glycerin if making tinctures for children.

Tinctures also get to your bloodstream faster--which means quicker healing, relief, or getting the use of the properties from the herbs.  I have some tinctures that I made earlier--of which I will discuss the properties of later in this entry.  For this entry, I will be making a White Willow Bark tincture.  White Willow Bark is where the pharmaceutical companies got the idea of asprin, so essentially, this tincture is homemade asprin--without the difficult-to-pronounce ingredients.

To make this tincture, all you need is some White Willow Bark, alcohol (I used 80 proof vodka. Or apple cider vinegar or vegetable glycerin if making tinctures for children), and a jar to hold the tincture while it's brewing (I am using a one quart canning jar).

I get my herbs from Mountain Rose Herbs--as they are certified organic and/or wild.

Fill the jar half way with the White Willow Bark (or whatever herb you are using).  

Next, pour in the vodka...

..up to the bottom of the neck of the jar.

Put a lid on it...literally...

...and shake.  That's it!

This is the tincture after the initial shake.  Allow to sit, shaking at least once a day, for 4-6 weeks.  You will also need to label your tinctures--so that you can keep track of the brewing time.


Below, you will see the other tinctures that I made earlier--as well as a brief description as to what they are used for...

Chamomile is good for promoting sleep and relaxation,

Peppermint is good for getting rid of gas and aids in digestion.  Also, as the name implies, peppermint gives you a little "pep in your step".

Red Raspberry Leaf is the perfect women's herb.  It is good for relieving menstrual cramps.  It also tones and tightens the uterus--so that it can be in good shape for pregnancy and labor.  This herb also has a plethora of vitamins and minerals, and is good for women of all ages.  I've been using Red Raspberry Leaf in tea form (or as an infusion--which is a very strong tea) for years, and I have nothing but high praise and esteem to Yahuah for creating this herb.  It is AMAZING, and EVERY WOMAN should have red raspberry leaf in her herb cabinet.

Ginger is good nausea.  It also helps relieve menstrual cramps.
Sage is good for sore throats and coughs.  The sage that I used for this tincture was grown in my garden a couple years ago.  I dried it, and stored it in one quart canning jars.  To make this tincture, I took the dried sage leaves and pulverized them in a spice grinder.  I ground enough to fill up half of the jar before pouring in the vodka.

Cayenne is good for the heart.  It also helps to regulate blood pressure.  Unlike the other tinctures--that will sit for 4-6 weeks,  the cayenne tincture will sit for three months.  Based on my research, the pepper used for this tincture needs to be at least 90,000 heat units to be effective.  Unfortunately, the cayenne that I purchased has only 30,000 heat units.  To make for this shortcoming, I added seven Bird's Eye Chili peppers to the mix--which are 100,000 heat units each.  I also added some cayenne peppers that I grew in my garden and allow to dry.  I simply ground the dried peppers (both the cayenne and Bird's Eye Chili peppers) in the spice grinder before adding to the jar.

This Niddah Tincture is one that I personally formulated.  Niddah is the Hebrew word for the women's monthly purification, in other words..her period.  It is a combination of red raspberry leaf, nettle, and red clover.  As mentioned earlier, red raspberry leaf is good for relief of menstrual cramps.  Nettle has iron--which is good to relieve the fatigue caused by the blood loss. Red clover acts as a natural form of estrogen.  It helps restore the estrogen that is lost as a result of the menses.


Finishing The Tinctures

This tincture has been sitting for a little over six weeks.  I think it's about ready.


Prepare your "straining station".  Now is the time to separate the solid herbs from the liquid tincture.  What I did here was place a mesh strainer in a one quart measuring cup, and then lined the strainer with cheesecloth--to ensure that no solids get into my tincture.

Next, pour the contents onto the strainer and into the cup.

Pick up the cheesecloth and squeeze out any remaining liquid from the herbs. If you don't have cheesecloth, take a spoon and squeeze the herbs in the strainer--thus releasing the remaining liquid. 


Next, pour into a dark glass bottle.  You want to do this in a dark bottle to protect the properties in the tincture that can be easily lost with light.  These are 4 oz bottles with droppers.  I got them from Amazon at a very reasonable price.  The funnel came from Amazon as well.  You can pour in the tincture without a funnel.  It would, however, behoove you to get one--as it makes the pouring much neater and easier.  Fill up the bottle to the bottom of the neck.  Don't fill all the way--as it will overflow.

Next, label your tincture.  It wouldn't hurt to put the year that it was made--so that you know how long you've had it.  Remember, these tinctures are made using alcohol--so they should last for several years.

Because the bottles were 4 ounces, and the canning jars are 32 ounces, there is going to be much extra tincture.  What I did at this time was to rinse out the jars, put the remaining tincture back in the jar, and stored it in a cool, dark, dry place--like a closet.  Eventually, I would like to get some dark glass bottles to store them.  That will happen in due time.  Or what you also can do is recycle any dark glass bottles that you have (i.e. wine, olive oil)and store the tincture in that.  A shout out to Heidi at Rain Country for that idea!

The rest of the tinctures have been bottled--at least the ones that are ready.  Since these are medicine, I stored these bottles in the medicine cabinet.

The remaining tinctures are in a cool, dark, dry place.  These jars are currently in the hallway linen closet.


I hope that this entry inspires you to start making your own herbal medicine.  When doing this, it would definitely behoove you to do your research--as well as know yourself and your body, so that there are no adverse affects.  Despite these being natural, it would also behoove all to take caution if you are taking prescription medications are are allergic to any ingredients. If you are taking prescription medications, please discuss the use of herbal remedies with your doctor.  That way, you can lessen and/or diminish the chances of adverse interactions.  With consulting your doctor, I still say do you research--as you may discover something that your doctor may not have known. Remember, they are trained in the use of pharamaceutical and have very little or no knowledge about herbal medicine.  In doing your research and talking with your doctor, they also may use something from you...but I digress.  I would still encourge you to take the natural path--in knowing that Yahuah has provided the herbs of the field as both food and medicine.  

Dosage-wise, you can take a few drops to a dropper-full (depending on your tolerance--as these can sting a little bit) under your tongue or add to water or juice.  In my opinion, I would encourage you to do the former because it will enter your bloodstream faster.

If you do make tinctures, please care to share as to which ones you've made--as well as what they are for.  I would like to learn as much from you as I hope that you are learning from me.  I look forward to hearing from you about the herbal medicine that you make.  Until then, Shalom Shalom!

Bathshua