
Shalom Shalom!
Now that the growing season is over, it is now time for cleaning the garden, planning for next year's garden, and...saving the seed. While it's good to plant a garden to grow your own food, saving the seed is just as important. By saving the seed, they can be used for growing any given crop in subsequent years. It's also cost effective--in that you won't need to purchase more seeds in the next year. This is extremely important if your goal is being self-sustaining. When you have companies like Monsanto--who requires farmers to purchase new seed every year (even if they have extra), we need to be certain to keep heirloom, open-pollinated seed--so that we don't have to follow that model. When saving seed, it is important that the vegetables that you plant are either heirloom or open-pollinated seeds. Heirloom/open-pollinated seeds, when you save them, will remain true (i.e. will come out to be the same each year). Hybrids, on the other hand, will not remain true, but perhaps some funky mystery plant. In the very near future, I will do an entry on my favorite seed sources...so stay tuned. Anywho, the purpose of this entry is seed saving. Below are some of the seeds that I actually saved and was able to document.
Now that the growing season is over, it is now time for cleaning the garden, planning for next year's garden, and...saving the seed. While it's good to plant a garden to grow your own food, saving the seed is just as important. By saving the seed, they can be used for growing any given crop in subsequent years. It's also cost effective--in that you won't need to purchase more seeds in the next year. This is extremely important if your goal is being self-sustaining. When you have companies like Monsanto--who requires farmers to purchase new seed every year (even if they have extra), we need to be certain to keep heirloom, open-pollinated seed--so that we don't have to follow that model. When saving seed, it is important that the vegetables that you plant are either heirloom or open-pollinated seeds. Heirloom/open-pollinated seeds, when you save them, will remain true (i.e. will come out to be the same each year). Hybrids, on the other hand, will not remain true, but perhaps some funky mystery plant. In the very near future, I will do an entry on my favorite seed sources...so stay tuned. Anywho, the purpose of this entry is seed saving. Below are some of the seeds that I actually saved and was able to document.
Saving Tomato Seeds
Tomatoes...The pinnacle of ANY garden. Unless you're allergic or don't like them, you will RARELY see ANY vegetable garden without tomatoes. You've enjoyed your bounty all summer long, so why not get it back by saving the seeds? Here's how:

All you need is one ripe tomato. The size doesn't matter--as long as it's ripe.
This tomato is called a Golden Jubilee.

Cut the tomato in half...

...and squeeze the seeds and the pulp in a container. As you can see, I am using a half-pint (4 oz) glass canning jar.

Keep jar uncovered and allow to sit until a mold forms at the top. Yes...mold!

Five days later, and you see the mold. I will admit, the mold set on after three days, but I didn't have time to get to this until two days later. The mold is okay! What needs to happen with tomato seeds is that they need to go through a fermentation process--in order to become viable for saving. The mold IS that fermentation process. It's all good.

Next, add water in the jar, to loosen the seeds...

...and use a mesh strainer to allow the water to pass and to catch the seeds.

Rinse the seeds until they are cleaned of any remaining pulp and mold.

Place seeds on a flat surface for a few days to dry. Once dry, store in a cool, dark, dry place.
Saving Sweet Pepper Seeds
Just as tomatoes, peppers, are just as integral. Although in the same family as tomatoes, pepper seeds do not need to go through a fermentation process. As a result, to save the seed is much simpler. Here's how:

Take a ripe sweet pepper. As you can see, this is a red bell pepper

Cut off the green top...

..and place on a flat surface top down.

Cut from the top, or shall I say, bottom...

...and around. Take care not to cut in the middle--where the seeds are.

This is what your pepper should look like. As you can see, the seeds are in the center of an inverted top.

All you do is simply scrape the seeds off of the top of the pepper, and onto a flat surface...

...and allow to sit out to dry for a few days. Once dried, store in a cool, dark, dry place.
Saving Hot Pepper Seeds
Do you like salsa? If you do, then hot peppers are required. Now, with processing hot peppers, you will need to take a bit of precaution, but you can do it, and trust me, it;s worth it. Here's how:

Take your hot peppers and put them on a flat surface.
These are Serrano chile peppers. They are usually eaten green, but when they ripen, they turn red. You want to make sure that the peppers are ripe for seed saving.

Here's the precaution...WEAR GLOVES! The heat in the peppers come from the ribs and the seeds. If you touch these areas without gloves, you'll want to wash your hands THOROUGHLY once done handling them. Otherwise, should your fingers touch a mucous membrane or any sensitive area, it will cause a sting in that area. So to avoid that altogether, it is advisable to wear gloves. Any thin gloves (i.e. Latex, Nylon) gloves will do.

Take the knife, and cut the the top off, and then inside around the ribs for easier removal. Once you cut around the ribs (the middle), place on a flat surface. You DO NOT want to cut the rest of the chile in this position--as you are at risk of cutting yourself. Safety first.
 ]
]
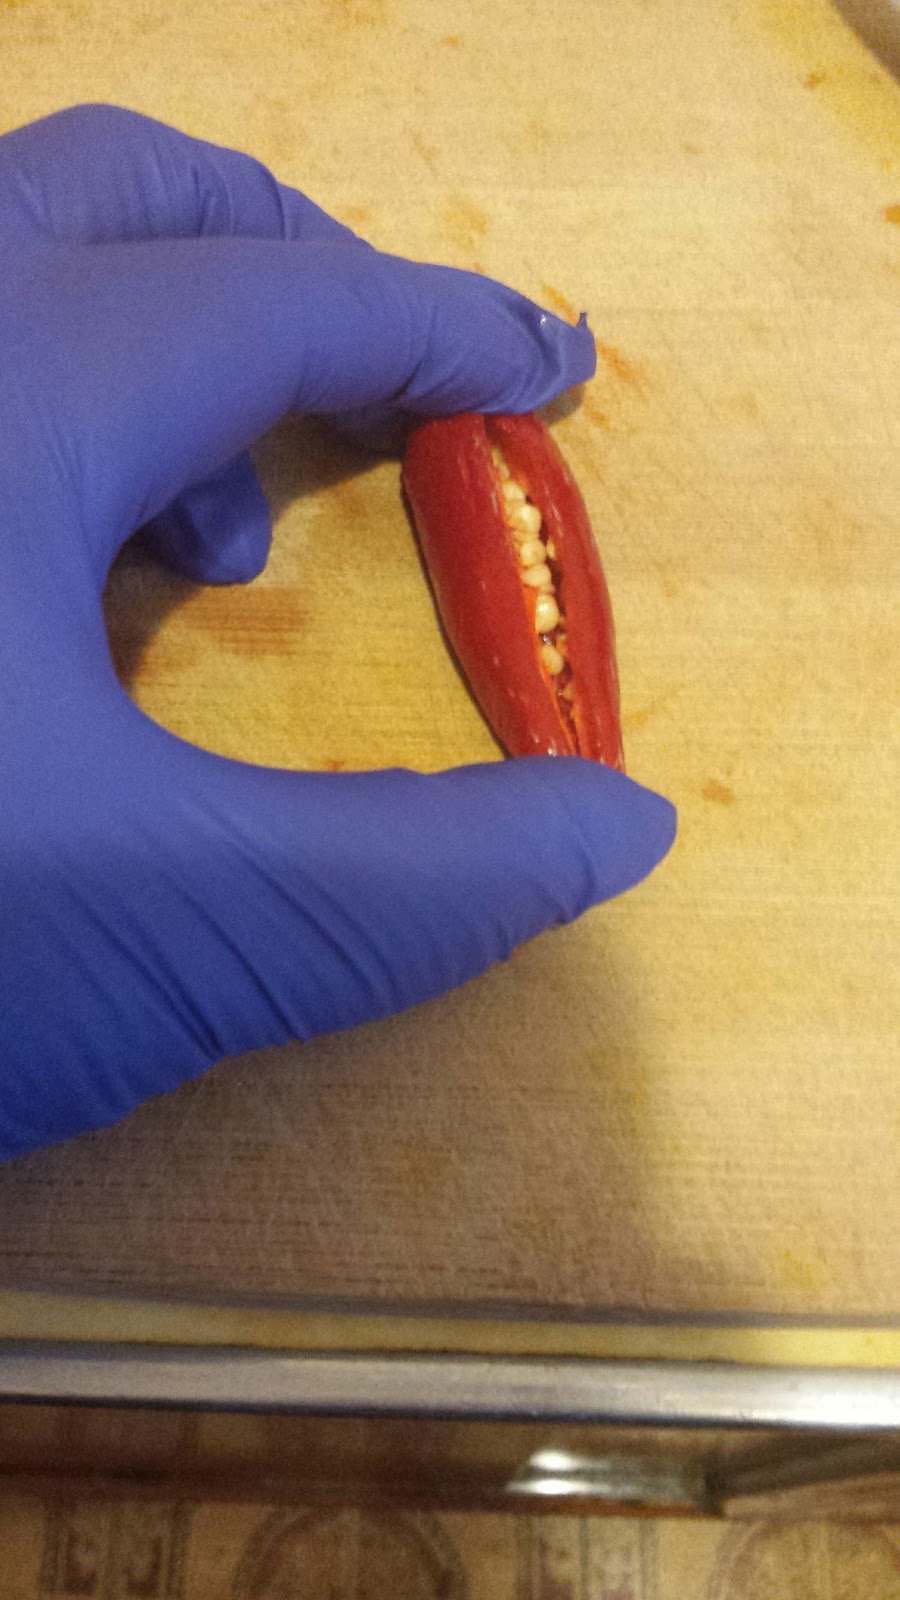
Once set on a flat surface, cut the chile down the middle...

..and open it up, exposing the seeds.

As with the sweet peppers, scrape the seeds out of the chile and onto a flat surface. Once dried, store in a cool, dark, dry place.
Storage

Once dried, store in a cool, dark, dry place. The first step is to put the seeds, once dried, in a receptacle. As you can see here, I stored my dried seeds in seed saving envelopes. I got these off of Amazon. There were 50 in a pack for a couple of dollars. If you don't have these, use some kind of envelope to store your seeds. After placing your seeds in an envelope, label them. Seeds do have a shelf life. Most seeds, when properly stored and depending on the kind of seed,will last for about 4 to 10 years, Label and date them for record keeping.What I also do is put the seed packets in a plastic bag, and in a plastic 5-gallon bucket that I keep in a closet. I also separate the seed packets based on the species of crop. That way, it keeps them better organized.
Please forgive the fuzziness of the picture--with which the labels are difficult to read. In case you're wondering, the seeds in the picture are the following: Golden Jubilee Tomato. Beefsteak Tomato, Roma Tomato, Red Bell Pepper, Serrano Chile Pepper, Star Of David Okra, and a seeded watermelon that we got from the grocery store. I know. The last one might make you go "Hmmmm". If you are aware, seeded watermelons are a rarity nowadays. Most or all of the watermelons in the grocery stores are seedless. The Most High meant for produce that comes from the ground to have seeds, so you'll want seed. So Yes, I will make a plan to from these in the future, but I digress.
Conclusion
I hope that this gives you inspiration in terms of seed saving, and that this will help you get started. If you start saving seeds, let me know. I'd be interested on how things turned out for you.
Thank you for taking the time to check out "Teacher Of Good Things". Until next time, shalom shalom!
Bathshua


